
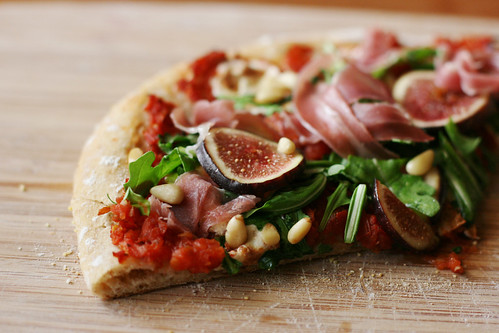
This is my new favorite pizza, inspired by one I had in Finland a few months ago. I love the way the fresh figs play off the prosciutto in spite of the fact that I’m generally not a fan of sweet and savory things. But fresh figs are hard to find, so more often than not, we end up making this pizza without them.
It’s made with the same no-knead dough recipe I’ve posted before, but this time you don’t need to make a big batch of it. This recipe will give you exactly the amount you’ll need for a pizza that fits in a 12-inch round cast iron pan. The dough takes very little effort to prepare, but it does take a long time to rise and then chill to a manageable temperature. But! It lasts two weeks in the fridge, so once you get past the two long waiting periods, you have two weeks to prepare homemade pizza in a pinch!
I added cup measurements for the flour, but the weight measurements are much more accurate so use those if you have a scale. If you do end up using the cup measurements, withhold some of the water and add it using the wet hand method described in the recipe until there are no more dry patches.
Since the tomatoes are freshly cut and do not simmer for very long, the tomato sauce does not taste quite the same as the tomato sauce you get on pizzas you order at restaurants. We sometimes replace one of the tomatoes with crushed tomato sauce and that gives it a more similar taste. It is nice with just the fresh tomatoes, too, you might just find that it’s a more acquired taste. We still add red chili pepper flakes to the tomato sauce so that the spiciness is evenly distributed. We also started adding red wine to the sauce and it adds a very nice sweetness so we almost always add it now.
As always, I’ve preemptively answered more questions you may have in the tips section. If you decide to make this or a version of this, I hope you enjoy it, and feel free to let me know so I know that this blog isn’t just my own personal recipe book. Who knows, maybe hearing from you will motivate me to post more regularly.
Low-sodium prosciutto (fig) pizza with arugula and pine nuts

Yields a 10″ pizza, serves 2
Ingredients
-
Dough
- 130 g (4.6 oz) all purpose flour (about 1 cup), plus extra for dusting
- 25 g (0.9 oz) whole wheat flour (about 1/4 cup)
- 1/2 teaspoon (2.5 ml) active dry yeast
- 1/6 teaspoon (0.82 ml) sea salt
- 118 ml (4 fl oz) lukewarm water (about 1/2 cup)
- stone ground cornmeal, for dusting
-
Sauce
- 2 medium-sized tomatoes
- 1 garlic clove, peeled and finely chopped
- 2 basil leaves, chopped
- 1 bay leaf
- 1/4 teaspoon (1.25 ml) dried oregano
- 1/8 teaspoon (0.62 ml) red chili pepper flakes (optional)
- 1 teaspoon red wine (optional)
- freshly ground pepper, to taste
-
Toppings
- 45 g (1.5 oz) mozzarella
- 1 1/2 cups (355 ml) baby arugula
- 2 slices of prosciutto, ripped into smaller pieces
- 2 figs, thinly sliced (optional)
- 1 1/2 teaspoons (7.4 ml) pine nuts
Directions
-
Prepare the dough
Combine the flours, yeast, and salt into a small container (we use a 1.6-liter/1.7-quart saucepan.) Pour the water over the mixture. With a wooden spoon, mix until the ingredients begin to combine and the dough becomes scraggly.
Reach in with wet hands and gently mix until all of the flour is incorporated and there are no dry patches. You might need to wet your hands a few times but be careful to only introduce as much water as you need to get rid of the dry patches.
Cover the container with a lid that is not airtight (or loosely with plastic wrap). Allow the dough to rest at room temperature until the dough rises and collapses or flattens on top, around 5 hours.
After the rising period, move the container to the fridge. Store the dough in the fridge with the lid that is not airtight (or loosely covered) for up to 14 days. It is normal for the dough to fall slightly in the fridge. The dough can be used right away after the initial rising period but it is very sticky and difficult to work with. It is much easier to work with it after it is refrigerated overnight.
-
Preheat oven
When you are ready to prepare the pizza, first preheat the oven to 500°F. (The dough should stay in the fridge while you prepare the sauce and toppings, just up until you are ready to roll it out.)
-
Prepare tomato sauce
Chop the tomatoes into small chunks and retain any juices. Transfer to a small saucepan and stir in the garlic, basil, bay leaf, dried oregano, freshly ground pepper, and, if using, red chili pepper flakes and red wine. Simmer the sauce over medium-low heat, stirring occasionally, until it reduces, about 30 minutes. You can slow cook the sauce for as long as it takes you to prepare the dough and toppings, but keep an eye on it and remove it from the heat if too much of the water starts to evaporate.
-
Prepare mozzarella
Break up the mozzarella into small chunks and set it on a paper towel so that it absorbs some of the moisture.
-
Roll out dough
Prepare the surface on which you’ll roll the dough with a generous dusting of cornmeal and flour. We use a wooden cutting board. Prepare also the baking surface with a generous dusting of cornmeal and flour and keep it away from the heat (ie. don’t store it on the oven).
At this point, you can remove the dough from the fridge. Dust your hands with flour and gently pull out the piece of dough. Shape it into a ball and set it onto the prepared rolling surface. Flatten it out with your hands as much as you can and sprinkle it with flour. Roll the dough out using a rolling pin or, if you don’t have one, a clean bottle. If the dough still sticks to the rolling pin, dust it with a bit of flour. Roll out from the middle until you get a circle with a diameter of approximately 10 1/2″. (The bottom of the 12″ cast iron pan we have is around 10″ but we roll it out a little big larger because the dough retracts.)
If you want a thicker crust edge, like we do, lift the rolling pin as you reach the edge. If you want a flatter crust edge, roll the dough past the edge.
If the dough is being stubborn and shrinks too much, put it in the fridge for a couple of minutes and then return to rolling it. If any holes develop, pinch them closed with floured fingers.
-
Prepare pizza for baking
Place the rolled out dough onto the cooking surface. I just use my flour-dusted hands to lift it into the pan. Once the rolled out dough is placed in the pan, dust the edges with some flour. It is now time to dress the pizza with the tomato sauce and the mozzarella. Spread the sauce out evenly over the dough, leaving a 1/2″ border at the crust edge. Distribute the mozzarella evenly over the sauce.
-
Bake pizza
Move the pan to the preheated oven, place it on the middle rack, and bake until the crust is slightly browned and the cheese is bubbly and brown, about 17 minutes.
-
Prepare the remaining topics
While the pizza is in the oven, prepare the rest of the toppings. The arugula, prosciutto, and figs should be at room temperature when the pizza is ready to be dressed, so allow them to reach room temperature while the pizza is in the oven. Toast the pine nuts over low heat in a toaster oven (or in a dry pan on the stove) until they are warm and slightly browned.
-
Prepare pizza to serve
Remove the pizza from the pan by lifting it out with a large spatula or two. Place it onto a cutting board and allow it to cool slightly before dressing it with the remaining toppings. Distribute first the arugula over the sauce, then the prosciutto, figs, and pine nuts.
Once the pizza is dressed, you can cut it. Using a large knife, cut it into slices by pressing down and then lifting the knife rather than dragging it across. This will give you neater slices and won’t cause the ingredients to be dragged off the pizza.
Bon appétit!
Process photos
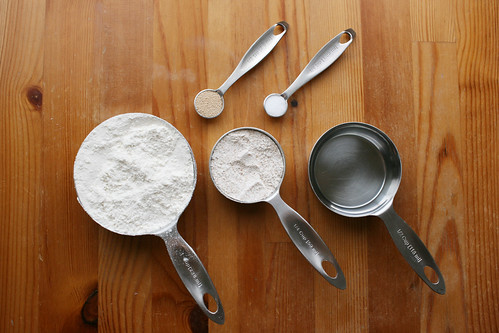
Dough ingredients
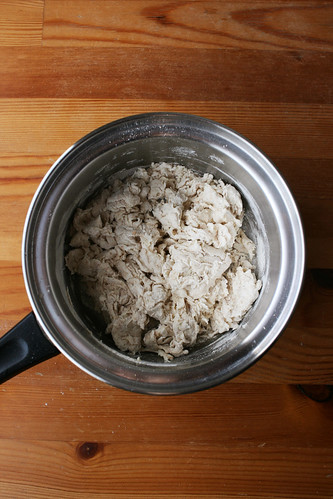
Scraggly dough

Dough after all of the flour has been incorporated
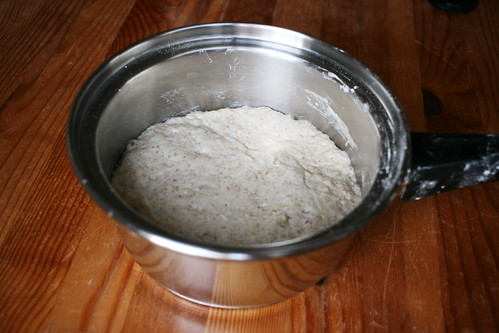
Dough after rising period

Pizza dough on prepared surface with “rolling pin” equivalent, a clean pasta sauce bottle
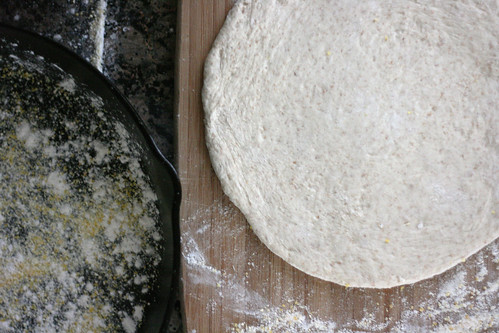
Rolled out dough and prepared cooking surface
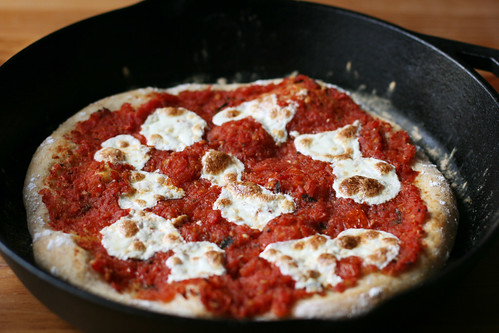
Cooked pizza

Tips
Sources of sodium
- Sea salt
- Mozzarella
- Prosciutto
Approximate sodium intake per serving: 472 mg
- 196 mg from the sea salt in the dough, which has 590 mg per 1/4 tsp (1.5g) serving
- 76 mg from the mozzarella, which has 95 mg per 1 oz (28 g) serving
- 200 mg from the prosciutto, which has 400 mg per 2 slice serving
- These values are calculated from the nutritional labels of the ingredients I used
Modifications
-
Reduce the sodium
You can use just one slice of prosciutto for the whole pizza, half a slice per serving.
The dough can, according to the authors of the book from which I adapt the recipe, be made without any salt whatsoever.
-
Increase the sodium
If we weren’t worried about our sodium intake, we would add more salt to the dough (1/4 teaspoon) and we would also add a pinch of salt to the tomato sauce because tomato dishes can generally benefit from a little bit of salt.
-
Canned tomatoes
If you’d prefer to use canned tomatoes, cubed, crushed or pureed tomatoes all work well. You likely won’t need to reduce the sauce as long and can use about 250ml (8oz) tomatoes. Just be very careful to choose a can that has either no salt added or a relatively small amount of sodium. Canned tomatoes sometimes have an astronomically high amount of salt added.
-
Other toppings
If you choose to add toppings to your pizza before you put it in the oven, it could affect the overall cooking time. Adding mushrooms and shrimp, our two other favorite pizza toppings, changes the amount of time it takes for the pizza to cook to about 20 minutes.
-
Other cooking equipment
We didn’t have a 12-inch cast iron pan when we first started making pizza and we made it in a cookie sheet instead. Ours
are fairly heavy duty. We baked the pizza for about 15-16 minutes until tomato sauce started to bubble and then turned on the broiler for another 2-3 minutes, until the cheese browned. If you have regular cookie sheets, double them and check on the pizza earlier. Please note, however, that most cookie sheets aren’t made for the high temperatures needed to make pizza so you’ll probably end up discoloring them, burning off the non-stick coating and end up with designated pizza-baking cookie sheets or ones for which you’ll need to use lining to use.
Handy tools
-
12-inch cast iron skillet
We have this preseasoned skillet which comes with a handy silicone holder to protect your hands from burns. If the pan is no longer less expensive if you buy it with the holder and you end up getting a holder separately, get it in black. Our red one has blackened at the edge from the high heat.
-
A large turner
We use this massive turner to transfer the cooked pizza onto the cutting board.
-
Cutting board
We’ve had the cutting board that’s been making appearances on this blog for five years, and if you look too closely at my pictures, you’ll realize it needed to be replaced, badly. I couldn’t find the same one again, but I recently got this thinner version which also comes with two adorable tiny cutting boards. Hand-wash only and oil occasionally to make it last and help prevent splinters.


Did you make this?
- If you recreate this recipe, I’d love to know! Leave a comment here and tag @alickofsalt on social media.

Pingback: California veggie melt sandwich | A lick of salt
Pingback: Sausage and potato roast salad with arugula and shallots | A lick of salt