Bowl, Brunch, Farro, Grains, Lunch, pistachios, Pomegranate, Quick, Salad, Side dish, Vegan, Vegetarian

Roasted cauliflower and farro salad with pistachios and pomegranate

Roasted cauliflower and farro salad with pistachios and pomegranate on alickofsalt.com

Here’s a hearty salad that can be its own meal or serve as a side dish. It is a simplified version of a recipe from April Bloomfield’s cookbook ‘A Girl and Her Greens.
’

The first time I made this, I steamed the cauliflower. I used to think that my least favorite part of cauliflower was what a horrible mess it made in my kitchen when I cut it. Turns out that I hate it steamed. While I was trying to figure out how a combination of things I like a lot on their own (cauliflower! farro! pistachios! pomegranate arils!) could make for such a disappointing dinner, my husband offered the following encouraging words: “It was as good as any other weird dish you’ve made.” It was the cauliflower’s fault.

The lesson here is, if you think you hate cauliflower, have you tried it roasted? There may be hope for you yet! It took a while to figure out how to roast cauliflower without overroasting it and therefore ruining a perfectly promising dish. The trick for me was getting the edges to brown while maintaining a teeny tiny bit of its natural crunchiness.

The dish reheats well so it makes for a great easy lunch or brunch companion. I usually reheat it by stir-frying it in a pan with a little bit of fat (olive oil or butter) and I love that the farro gets its shape and some more of its chewiness back. Some things to keep in mind for reheating: the pistachios will no longer be crunchy and the pomegranate arils will fade in color if you overcook them. If these are potential disappointments for you, withhold the pistachios and pomegranate arils when combining the salad, sprinkle them individually on each portion, and store any leftovers separately.

The recipe instructions assume you don’t have already have cooked farro on hand, but I think that actually this recipe would be even better if you fried the cooked farro before combining it with the rest of the ingredients. I have not tried this yet so I didn’t write it in to the instructions but if you make this, I hope you’ll try frying the cooked farro and let me know how it turned out!

Continue reading

Standard
Dinner, Duck, Lunch, Meats, Pasta

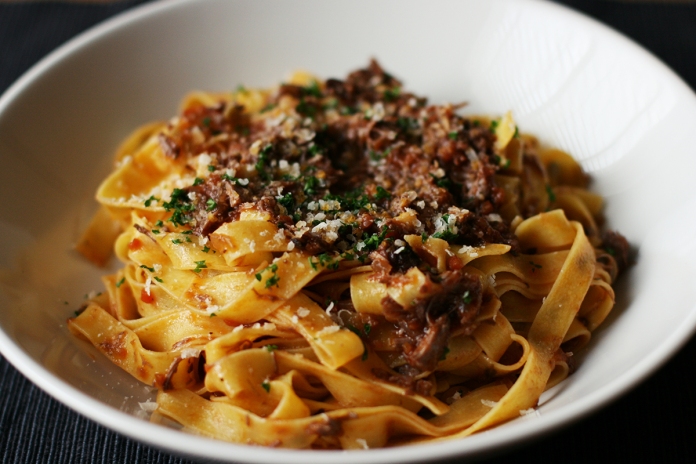
Braised duck and red wine ragu pasta

Braised duck and red wine ragu pasta

This is a very lovely meal to make for people you love very much because it takes forever. But it is very much worth it, and if there’s just two of you, you get to enjoy not one but two leftovers!

As tends to be the case with sauces, this tastes better the next day, so you can make the ragu with a full belly and then all you’ll have to do the next day is heat it up and cook the pasta. You can enjoy a quick but decadent dinner even on a weekday!

The recipe is written to be leftover friendly. Cook only the pasta you need on the day you’re having it (step 11), and combine it with as much sauce as each person desires, directly into each plate.

Also written into the recipe is one way in which to prevent the pasta from hardening and sticking together: combining it with a little bit of sauce. This is a less photogenic option than adding the sauce to the bare pasta at the dinner table but I personally think this is a photogenic sacrifice that is worth making. I’ve also heard you can prevent the pasta from hardening by running it under cold water and then under hot water again to heat it back up, which I’ve tried but was not happy with because I couldn’t get the pasta to get hot enough. And I’ve read that you can instead combine the pasta with some olive oil, but I have not tried this because I’m worried it would become too greasy. #pickyeaterproblems

This dish would be even more lovely with homemade pasta. I use the next best thing, egg pasta imported from Italy. I still use the Filotea brand that I buy from the World Market section of my local Bed Bath & Beyond. I did run out and tried a pasta that was still imported from Italy but was 100% semolina for a set of portions and I’m sorry to say that I was disappointed. You likely need to add quite a bit of salt to the water when making non-egg pasta to have it taste good, and I don’t know enough about the chemistry to know how adding salt to the water affects the sodium content of the dish.

I made this first for a surprise birthday dinner for my husband and then it took a year for duck legs to come back in stock at Whole Foods so I could remake it. I loved it the first time but there’s just something about the novelty of making something that’s time-intensive for the first time that prevents me from being able to be objective. Second time around, the ragu is still delicious and since the recipe yields 6 portions, the amount of time and effort it takes feels more worth it.

Continue reading

Standard
Brunch, Dinner, Lunch, Meats, potatoes, Quick, Salad, Sausage

Sausage and potato roast salad with arugula and shallots

Here’s a quick, weeknight friendly dinner to try out now that it’s fall and the oven is back in commission. This salad has a very complex taste for how few ingredients it combines and it is tasty with both fingerling and colorful mini potatoes.

The recipes this one is adapted from call for a lot more sausage and shallots. I’ve made this several times and tweaked the recipe with each iteration until I finally found a balance I liked with enough sausage to be filling but not too heavy and just a small amount of shallots, enough to add a little bit of sweetness. 1/2 sausage link per person is plenty for lunch or brunch and can be increased to 3/4 of a link for dinner (and the remaining sausage can be used as a pizza topping!) I use just one shallot per person, and I peel and slice it before I roast it so it can caramelize and crisp in the pan. I try to keep as much of the basal stem in tact as I can when I separate it from the roots so the shallot layers stay together when I slice it. I keep the shallots in for the same amount of time as the potatoes because I like them extra crispy. If they look too crispy for you, they can be removed before the final stir, as noted in the instructions.

The only decision I’m still on the fence about is how small to cut the sausage before roasting. Cutting them into 1″ pieces yields pieces large enough to slice into that stay tender inside whereas cutting them into 1/2″ pieces produces crispier and bite-sized pieces that can be more evenly distributed in the salad. For the salad in these pictures, the sausage is cut into 1/2″ pieces and I used 1/2 sausage link per person.

Continue reading

Standard
Avocado, Carrots, Lunch, Quick, Vegetarian

California veggie melt sandwich

California veggie melt sandwich on alickofsalt.com

Veggie melt sandwich with crushed avocado, handcrushed pesto, melted cheese, grated carrots, tomato, baby kale, and sprouts, aka the most Californian sandwich that ever existed. This is inspired by a sandwich I used to get at Cafe Literati in Los Angeles before they stopped making it. It was served with homemade potato chips on the side. I eat it with Kettle unsalted chips or purple heirloom chips.

This would be perfect in a panini press. I don’t have one, so the instructions are for making it in a toaster oven. Since the vegetables don’t need to be warmed, I split up which ingredients I heat up. But I do have the other ingredients ready so I can compile the sandwich quickly and enjoy it warm. If you have a panini press, compile the whole sandwich before pressing.

For those on low-sodium diets, my recipe for low-sodium bread yields about 3 normal-sized loaves. I’ve been working on a recipe that yields exactly one loaf but just using 1/3 of the ingredients from the recipe I posted doesn’t work as well as I expected, and neither does doubling pizza dough recipe so I’m still perfecting it. Pictured here is a trial of a light whole wheat bread with added sesame seeds. This picky eater thinks it came out a bit dense.

If you can’t be bothered to make your own bread (or if it’s too hot!) get bread with the lowest sodium content you can find that isn’t pre-sliced and slice it into thin slices. The serving size on the packages is listed for about 1/8 of a loaf so thinner slices make a big difference.

Lately I have been reheating bread I buy in store and it is the best! Heat the loaf directly on the oven rack for 5-8 minutes at 400°F, transfer onto a cooling rack and wait at least 5 minutes for it to cool before slicing, and then enjoy crusty, fresh-tasting bread!

Continue reading

Standard
Brunch, Drink

Red wine sangria (or make it virgin)

Red wine sangria (or make it virgin)

I usually make a batch of sangria at least once a year. It’s definitely the most refreshing way to enjoy wine in the summer!

This is strong and not overly sweet when it is chilled and it does need to be served chilled. There’s quite a bit of added brandy to make up for the added juice and it is likely strong enough to serve with your choice of fizzy water (sparkling water, club soda, etc), which you’ll want to add in just before serving to prevent it from going flat. And you can always add more brandy later if the sangria turns out to not be stiff enough for your taste!

I drink it on the rocks without anything added because I’m not a big fan of fizzy drinks and it’s strong enough that I typically won’t want more than one glass. If you’re like me, you might actually want to start with only 1/2 cup of the brandy and then add more as needed.

You don’t need to use good wine to make sangria. I make it using half of a jug of wine and I’ve used boxed wine, as well.

The yield of this recipe is large enough to make it worth the work of hand-squeezing citrus but not large enough that I end up feeling sick of sangria and not wanting it again for a year. I hand-squeeze the citrus into a glass measuring cup with a spout and I put a strainer over the mouth of the measuring cup to catch any seeds and pulp. It’s hard to tell how much juice citrus will yield; choose softer oranges and limes and get extra just in case. That being said, there’s quite a bit of fruit in this sangria. You can use half the fruit if you won’t want to garnish every glass with steeped fruit.

I like to cut the fruit into slices because it is much prettier and photogenic that way, and because the fruit is heavier so it’s less likely to hit you in the face as you drink it (I know you know what I’m talking about!). But it is easier to serve when the fruit is cut into wedges.

If you’d like to add berries, you can add them right before you serve the sangria. Strawberries in particular will fade and gray.

When I make sangria for parties, I usually make a virgin batch as well. The recipe is pretty much the same but I replace the wine and brandy with grape juice and I reduce or skip the added sugar since juice already has lots of sugar.

Continue reading

Standard
Breakfast, Brunch, Nuts, Pecans, Snack

Favorite granola with puffed grains, pecans, maple syrup, and honey, revised

Favorite granola with puffed grains, pecans, maple syrup, and honey on alickofsalt.com

Granola is a staple breakfast at our house and a frequent ice cream topping. This puffed grain granola is my most requested recipe and the recipe I’ve most gifted or made for others. I’ve once again made a few changes since I last posted it on the site. I always make the recipes I post at least twice before I post them, using the second time as a recipe test of sorts. Somehow the moment I post it signals the time for another change because the recipe I end up making time and time again is almost always a slightly revised version of the one I post. This is the latest version of my favorite granola.

My favorite granola started out as crunchy clusters with almond slices, a recipe adapted from Deb Perelman‘s Smitten Kitchen Cookbook. I then added puffed grains and other ingredients from Kashi’s GoLean Honey Almond Flax Crunch cereal. I then replaced the almond slices with pecans and the puffed wheat with kamut and started baking it in porcelain dishes to give me more room to stir the ingredients while the granola was baking. In this latest version, I added puffed millet and took out the flax seeds.

One hack I’ve learned is to “grease” the tablespoon before measuring out the honey. I measure out the first tablespoon of butter or oil, then measure out the honey so it slides right out, then repeat. Of course, you’d need to be able to pour the honey into the tablespoon to be able to measure it out in this way. I wouldn’t want you to contaminate your honey with a dirty tablespoon if you’re planning on scooping the honey out of a jar.

To best beat the heat, I double the recipe and I make it either in the early morning, before my apartment turns into an oven all on its own, or in the evening. That way, I only have to suffer once in the added oven heat for two batches of granola. Still seems to run out quicker than I would hope.

Continue reading

Standard
Dessert, Fruit, Key lime, Lime, Snack

Key lime pie popsicles

Key lime pie popsicles

Now that summer is in full bloom, we almost always have a batch of popsicles in our freezer. It’s usually the strawberry raspberries ones, which are still my favorite. But when we’re feeling fancy, we make these key lime pie ones. They’re delicious and pretty easy to prepare. Just four ingredients for a rich yet refreshing dessert! The hardest part is waiting for them to set.

We used regular limes here, not key limes, so I guess they’re technically just “lime pie popsicles,” but I don’t think lime pie is a thing? In any case, I had to make these after I ordered a slice of key lime pie at a restaurant, which reminded me a lot of these popsicles except that the pie was too rich and not as tasty so my craving wasn’t satisfied until I remade these. I think that the crunchy graham cracker crumbs add a lot for me. Speaking of which, you have to cover these with graham crackers just before serving, as I learned the hard way. I was a slow poke with this photoshoot and the popsicles melted too much so I popped them back in the freezer but then they came out with soggy crumbs.

The recipe from which this recipe is adapted calls for 3/4 cup of freshly squeezed lime juice, but our limes are very sour so I only use 2/3 cup. If you’re using limes that are on the sweeter side, use the higher measurement. I got 2/3 cup of lime juice from 6 regular limes that I hand-squeezed, which weighed 0.75 lb (350 g). I always find it hard to tell how juicy limes will be, so I choose softer limes and I get a bunch just in case.

I usually crush the graham crackers with my fingers on the plate on which I serve them. (They’re messy so they need to be served with a plate anyway.) I use half of a graham cracker sheet (2.5″ x 2.25″) per popsicle. I like the bigger chunks so I crush them coarsely and then press each side of the popsicle into the crumbs. I press the smaller crumbs in with my fingers to get the popsicle completely covered and it helps if it melts a tiny bit in the process so I don’t worry about working too quickly if I’m only preparing two popsicles at a time.

Continue reading

Standard
Dinner, Lunch, Pasta, Quick, Seafood, Shrimp, Walnuts

Shrimp pasta with parmesan and ground walnuts

Shrimp pasta with parmesan and ground walnuts

We’ve been eating more pasta since I discovered egg pasta that tastes more like freshly-made pasta than the kind we can find at our grocery store. Egg pasta is generally yellow, looks more brittle, cooks more quickly and comes, for some mysterious reason, in fragile packaging like bags or boxes with an exposed, shrink-wrapped front. The kind we get is much pricier than the $1 boxes of pasta we used to get, but it’s so much tastier, it’s completely worth it. It also has some sodium from the egg so it tastes good on its own even though we don’t salt the water when we cook it.

This recipe is fairly quick but it does require a little bit of multitasking and figuring out the timing can be a little tricky. We first prepare the shrimp and set it in the fridge to marinate for at least half an hour. We’ve found that marinating it in a carbonated beverage helps make the shrimp taste more tender. We usually marinate it in the cheapest beer we have; pop or soda also works well. We aim to have the pasta and the sauce ready at the same time so we give the pot of water for the pasta a little bit of time to warm up, then start preparing the sauce in a frying pan. We start cooking the pasta after we add the shrimp to the sauce and give it a couple of minutes to cook. The shrimp cooks pretty quickly so the timing will need to be adjusted if you’re using a pasta that takes longer than 4 minutes to cook.

Continue reading

Standard
Beans, Carrots, Chickpeas, Corn, Dinner, Legumes, Lunch, Pepper, Vegan, Vegetables, Vegetarian, Zucchini

Vegan chili

Vegan chili

This vegan chili is very filling and quickly made its way into our rotation of favorite dinners. It’s got protein from the beans and chickpeas, lots of vegetable and lots of spices. It’s very tasty and sort of sweet and doesn’t give you that heavy feeling some chili can. We get three dinners out of one batch so it’s a lifesaver during crunch time.

The recipe is based on the vegetarian chili recipe from Archie Moore’s, a small chain of American-style restaurants around New Haven. Most people go there for their wings but I almost always got a bowl of veggie chili. This is a vegan replica of that, the only missing ingredient being shredded cheddar cheese used as a topping. I eat the chili with tortilla chips so I find it filling enough without the cheese and don’t really miss it, but (vegan) cheddar cheese can be added as a topping. I like this adapted recipe so much, I was not even tempted to go back for the original the last time I visited New Haven.

I use a large 7.5 quart (7 liter) pot to cook the chili and it is much too big. The second largest pot I have, however, is 3.2 quarts (3 liters) and wouldn’t give me enough room to stir. A pot of any size in between should work well.

It takes a while to get all of the ingredients ready. To cut down on prep time, I get the onion, garlic, spices, broth, and tomato sauce ready before I begin and I prepare the rest of the ingredients while cooking. I chop up the carrot while the onion is cooking, I open the remaining cans while the sauce is cooking, and I chop up the remaining vegetables while the sauce with the legumes and corn are cooking. The zucchini and peppers do overcook when the chili is reheated, so if you’re making ahead, add them in when reheating, and simmer them for 15 minutes before eating.

My absolute favorite tortilla chips for this chili are multigrain scoops. They’re little edible spoons! And there’s something about the multigrain that makes the chili taste even heartier and tastier. These chips are very hard to find in my neighborhood so I order them online and sometimes they arrive in good condition and sometimes they arrive mostly crushed, so I don’t always get my first choice. Regular scoops taste too salty for me so my second choice is tortilla chips that are made in store in our grocery store. They’re thick enough to allow me to scoop up the chili, don’t have much salt, are very inexpensive, and remind me of homemade tortilla chips. Homemade tortilla chips are fairly easy to make from corn tortillas if you cut some tortillas up into triangle shapes and they are so, so good warm. But you have to have the patience and/or tools to fry them. I, for one, have never had this with homemade tortilla chips.

Continue reading

Standard
Dinner, Figs, Lunch, Pizza, Prosciutto

Prosciutto (fig) pizza with arugula and pine nuts

This is my new favorite pizza, inspired by one I had in Finland a few months ago. I love the way the fresh figs play off the prosciutto in spite of the fact that I’m generally not a fan of sweet and savory things. But fresh figs are hard to find, so more often than not, we end up making this pizza without them.

It’s made with the same no-knead dough recipe I’ve posted before, but this time you don’t need to make a big batch of it. This recipe will give you exactly the amount you’ll need for a pizza that fits in a 12-inch round cast iron pan. The dough takes very little effort to prepare, but it does take a long time to rise and then chill to a manageable temperature. But! It lasts two weeks in the fridge, so once you get past the two long waiting periods, you have two weeks to prepare homemade pizza in a pinch!

I added cup measurements for the flour, but the weight measurements are much more accurate so use those if you have a scale. If you do end up using the cup measurements, withhold some of the water and add it using the wet hand method described in the recipe until there are no more dry patches.

Since the tomatoes are freshly cut and do not simmer for very long, the tomato sauce does not taste quite the same as the tomato sauce you get on pizzas you order at restaurants. We sometimes replace one of the tomatoes with crushed tomato sauce and that gives it a more similar taste. It is nice with just the fresh tomatoes, too, you might just find that it’s a more acquired taste. We still add red chili pepper flakes to the tomato sauce so that the spiciness is evenly distributed. We also started adding red wine to the sauce and it adds a very nice sweetness so we almost always add it now.

As always, I’ve preemptively answered more questions you may have in the tips section. If you decide to make this or a version of this, I hope you enjoy it, and feel free to let me know so I know that this blog isn’t just my own personal recipe book. Who knows, maybe hearing from you will motivate me to post more regularly.

Continue reading

Standard